


If you’re still clinging to Universal Analytics, it’s time to face the truth: Google Analytics 4 (GA4) is here, and it’s quickly becoming the new standard. If you haven’t already switched, you’re likely missing out on key data that could be shaping your business decisions. GA4’s enhanced eCommerce tracking and event-based data offer insights that can take your store from “okay” to “outperforming competitors.” But here’s the catch: just having GA4 isn’t enough—you need to leverage it properly to see the real impact.
Without GA4, you’re working with one hand tied behind your back. You might be gathering data, but it’s nowhere near the level of predictive insights GA4 provides. Without proper setup, you’re missing out on understanding what your customers are likely to do next—critical insights that could be the difference between a sale and a lost opportunity.
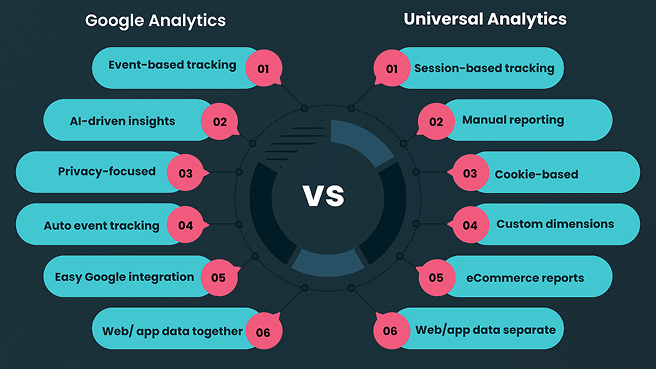
The illustration below highlights the key differences between GA4 and Universal Analytics, giving you a clear view of what you’re gaining by making the switch. If you’re unsure about setting it up correctly, consider hiring experts to ensure you get the most out of GA4.
This guide isn’t about rushing to get GA4 up and running; it’s about setting it up right from the start. We’ll show you how to set it up effectively so you can track what truly matters, boosting conversions and streamlining decisions that impact your bottom line.
What You Need Before Setting Up GA4
Before diving into the technical setup of Google Analytics 4 (GA4), there are a few key prerequisites you’ll need to ensure you’re fully prepared. Setting up GA4 correctly requires access to specific tools and permissions, so let’s make sure you have everything in place before moving forward. Let’s go through the essentials to get you on the right track.
Do You Have a Google Analytics Account Set Up?
First things first—do you have a Google Analytics account set up? If not, you’ll need to create one to start leveraging GA4. It’s a simple process, but an essential one. Make sure you have an active account before proceeding with the setup.
Access to Your Store’s Backend or Tag Manager
To implement GA4 on your eCommerce store, you’ll need access to the backend of your store and/or the Google Tag Manager (GTM). Without these, you won’t be able to install or manage the tracking codes, which are critical for GA4 to function correctly.
Essential Tools You’ll Need: GA4, Google Tag Manager, and GA Debugger
For a smooth setup, you’ll need some basic tools: a GA4 account, Google Tag Manager (GTM), and the GA Debugger extension. These tools will help you manage tags, test data, and ensure that everything is firing correctly before you finalize your setup.
Optional Tool: BigQuery for Advanced Data Analysis
While not required for all store owners, if you’re planning to scale your data analytics and work with advanced data pipelines, consider using BigQuery. This tool can help you analyze large sets of data and gain deeper insights into customer behavior, making it an excellent option for growing businesses.
Step-by-Step: Creating a GA4 Property
Setting up your Google Analytics 4 (GA4) property is a critical first step in getting your data flowing correctly. Follow this simple, step-by-step process to ensure a smooth setup.
- Go to Admin > Create Property Start by navigating to the Admin section in your Google Analytics account. From there, click on Create Property to begin the setup process.
- Fill Out Business Details Next, you’ll need to enter your business information, including the property name, time zone, and currency. This ensures that GA4 is tailored to your business’s specific needs.
- Select Web or App + Web Choose between Web or App + Web depending on whether you’re tracking a website, an app, or both. For most eCommerce stores, you’ll select Web.
- Create Data Stream Once your property is created, you’ll need to create a data stream. This stream will collect data from your website (or app) and send it to GA4 for analysis.
- Add Measurement ID After creating the data stream, you’ll be given a Measurement ID. This ID is used to link your website or app to your GA4 property for accurate data collection.
✅ Tip: Don’t Delete Old UA Property if It Exists
If you still have a Universal Analytics (UA) property, don’t rush to delete it. Instead, run it in parallel with GA4 to ensure a smooth transition and gather data from both properties.
Installing GA4 on Your Online Store Platform
Getting GA4 installed on your eCommerce platform is crucial for tracking and analyzing customer interactions. Here’s a breakdown of how to install GA4 on different store platforms.
Shopify (Without GTM)
If you prefer to set up GA4 without using Google Tag Manager, you can manually add the GA4 tag to your Shopify store.
- Add GA4 tag manually to theme. Liquid: Open your theme.liquid file in Shopify.
- Place the tag before the </head> tag: Insert your GA4 Measurement ID before the closing </head> tag in your theme’s HTML.
- Limitations of this approach: While this method works, it doesn’t allow for tracking the full funnel events. You’ll miss out on more advanced tracking capabilities.
Shopify (With Google Tag Manager)
Using Google Tag Manager (GTM) makes the process smoother and more flexible. Here’s how to do it:
- Create GA4 configuration tag in GTM: In Google Tag Manager, create a GA4 configuration tag and enter your Measurement ID.
- Add GTM container to Shopify theme: Embed the GTM container code into your Shopify theme, ensuring it’s placed in the head section of your theme. Liquid file.
- Publish and verify: Once the setup is complete, publish the container and verify that GA4 is collecting data properly.
WooCommerce
For WooCommerce stores, you can either use a plugin or install GA4 through GTM.
- Use a plugin like “GA4 Integration for WooCommerce”: Install and configure a plugin that automatically integrates GA4 with your WooCommerce store.
- Install via GTM: Alternatively, set up GA4 through Google Tag Manager, and ensure standard eCommerce events like add to cart and purchase are being tracked.
Magento
For Magento stores, GA4 can be set up either manually or through extensions.
- Manual setup: You can manually insert the GA4 tag into your Magento store’s code or use GTM for tag management.
- Extension-based setup: Use Magento-specific extensions that facilitate GA4 tracking.
- Use GTM or server-side integration: For advanced event tracking, integrate GA4 through server-side or GTM, which allows for better control and more accurate data collection.
Setting Up Key GA4 Events for eCommerce
Tracking the right events in Google Analytics 4 (GA4) is crucial to understanding how users interact with your online store. Here are the essential eCommerce events you should configure to get a complete view of your customer journey.
Key eCommerce Events to Track
- view_item: This event tracks when a customer views a product page. It’s a fundamental metric that shows which products are attracting attention, helping you gauge interest levels.
- add_to_cart: When a customer adds an item to their cart, it signals strong purchase intent. Tracking this event helps you understand which products are being considered for purchase.
- begin_checkout: This event is triggered when a customer starts the checkout process. It’s an essential indicator of the customer’s commitment to completing the purchase, giving you insights into cart abandonment rates.
- Purchase: The ultimate goal—this event tracks completed transactions. It helps you measure your sales, revenue, and the effectiveness of your marketing efforts.
- view_promotion: This event captures user interaction with promotions, such as banners, discounts, or flash sales. It helps you evaluate the success of your promotional strategies.
- Refund: Tracking refunds is key to understanding customer satisfaction and return rates. It gives you insights into potential issues with products or the shopping experience.
How to Implement These Events
To implement these events, use Google Tag Manager (GTM), which allows you to push the events to GA4 using dataLayer. If you’re using plugins that support dataLayer, they can automatically send these events without needing much manual setup.
By tracking these core events, you’ll gain a clearer picture of how customers interact with your store and identify opportunities for improvement throughout the buying journey.
Enabling Enhanced Measurement Features
To get the most out of Google Analytics 4 (GA4), enabling Enhanced Measurement Features will give you automatic tracking for essential events on your site. These features provide deeper insights into how users interact with your store, without the need for additional coding.
Scroll Tracking, Outbound Clicks, and Site Search
Start by enabling key Enhanced Measurement Features in GA4, such as:
- Scroll Tracking: Tracks how far users scroll down a page, helping you understand engagement with your content.
- Outbound Clicks: Captures when users click on external links, letting you monitor traffic sent to other websites.
- Site Search: Tracks internal site searches, providing valuable insights into what users are looking for on your site.
These features are incredibly useful in gaining a deeper understanding of your site’s performance and user behavior.
Custom Dimensions for Products and Variants
For more detailed tracking, you can set up custom dimensions to capture essential attributes such as product categories, variants, and any other custom attributes that matter to your business. This enables you to track more granular data that can help improve marketing and sales strategies.
GA4 Limitations: 50 Custom Dimensions
Keep in mind that GA4 allows for only 50 custom dimensions at a time. While this should be sufficient for most stores, it’s essential to prioritize the most important attributes for your tracking setup. Once you hit this limit, you’ll need to manage which dimensions you use carefully.
How to Test and Validate Your GA4 Setup
When setting up Google Analytics 4 (GA4), you need to ensure that it’s working correctly. Testing your setup is crucial to verify that data is being captured accurately. Let’s break down the most effective ways to test and validate your GA4 setup, ensuring you’re on the right track for tracking user behavior and making data-driven decisions.
Use Google Tag Assistant
Don’t leave your setup to chance. Google Tag Assistant is a tool that helps you verify if your GA4 tags are firing correctly on your website. With just a few clicks, you’ll know whether your tags are sending data properly to GA4. This tool is indispensable because it makes tag tracking easy and error-free, ensuring everything is in place. If the tags aren’t firing correctly, you can quickly diagnose and fix issues without wasting time. Getting this right is essential, so let’s make sure you’re all set.
Use Real-Time Reports to Verify Data
Once your tags are set up, you need to test them in real-time. GA4’s real-time reports allow you to see user activity as it happens, which is an immediate and effective way to check if your data collection is working as expected. When you navigate to the Real-Time section in GA4, you’ll see user actions, such as page views, clicks, and more. This instant feedback loop ensures your setup is live and accurate—no guessing, just facts. It’s time to check those live reports to confirm everything is working smoothly.
Common Testing Issues and Fixes
Testing isn’t always perfect. You might encounter common issues during GA4 setup, such as missing data, delayed reporting, or incorrect event tracking. Thankfully, these issues are usually fixable with a bit of troubleshooting. From checking tag placement to ensuring that events are configured correctly, most problems are simple to resolve. Understanding these common challenges—and knowing how to solve them—ensures your setup continues to run smoothly. If you’re facing issues, don’t stress. We’ve got the fixes covered.
By the time you finish testing your GA4 setup, you’ll have complete confidence that your store’s data tracking is accurate and reliable. Ready to take your tracking to the next level? Let’s keep testing until everything is firing perfectly, so you can unlock all the insights GA4 has to offer.
Optional: Linking GA4 with Other Google Tools
To unlock the full potential of your Google Analytics 4 (GA4) data, consider linking it with other powerful Google tools. By integrating GA4 with tools like Google Ads, Google Search Console, BigQuery, and Looker Studio, you can gain deeper insights, enhance your tracking, and drive more effective decision-making. Here’s how these integrations can elevate your data game.
Google Ads For Conversion Tracking and Audience Retargeting
Integrating Google Ads with GA4 is a game-changer for conversion tracking and audience retargeting. By linking the two, you can directly track how your ads are driving user actions on your site. With GA4’s insights, you can create custom audiences for retargeting, optimize your campaigns based on real-time data, and measure the return on ad spend (ROAS) more effectively. It’s all about creating more targeted, high-performing campaigns.
Google Search Console
Connecting Google Search Console with GA4 brings your organic search performance into the analytics mix. By combining search query data with user behavior on your site, you can analyze how well your SEO efforts are paying off. This integration allows you to track keyword performance, see which landing pages attract organic traffic, and refine your SEO strategy based on search impressions and click-through rates (CTR).
BigQuery For Raw Data Exports and Modeling
If you’re ready to dive deep into your data, integrating BigQuery with GA4 allows you to export raw data and perform advanced data modeling. Whether you’re looking to analyze large datasets, create custom reports, or build predictive models, BigQuery gives you the power to manipulate your data in ways that go beyond standard GA4 reporting. This integration is ideal for businesses with complex data needs or large-scale tracking requirements.
Looker Studio For Dashboard Reporting
For businesses that need easy-to-digest, customizable reporting, Looker Studio is the tool to link with GA4. By creating dynamic dashboards in Looker Studio, you can visualize your data, track key performance indicators (KPIs), and share insights across your team in a visually appealing and accessible format. It’s the perfect solution for making your data not only actionable but also visually impactful.
Integrating GA4 with these tools enhances your ability to make smarter decisions, streamline your reporting, and unlock powerful insights. Ready to get more out of your Google Analytics 4 setup? These integrations are the key to doing just that.
Mistakes to Avoid When Setting Up GA4
To make the most of Google Analytics 4 (GA4) for your eCommerce store, it’s essential to avoid a few common setup mistakes. These oversights can affect data accuracy and impact your ability to optimize effectively. Here’s what you should watch out for to ensure you’re tracking the correct information and making informed decisions.
Not Setting Up eCommerce-Specific Events
Failing to configure key eCommerce events like add_to_cart, purchase, and begin_checkout can leave you in the dark about how customers are interacting with your store. These events are essential for understanding user behavior and optimizing your sales funnel.
Forgetting to Remove UA-Only Plugins
If you’re transitioning from Universal Analytics (UA) to GA4, don’t forget to remove any UA-specific plugins. Leaving them active will lead to data inconsistencies or duplicated tracking. Clean up your setup for smooth data flow and accurate reporting.
Relying on Default Reports Without Customizing
While GA4 provides default reports, they may not be tailored to your store’s needs. Take the time to customize your reports and track key metrics like conversion rates and user engagement specific to your store. Customization helps you capture the data that truly matters for optimization.
Set Up Cross-Domain Tracking for Subdomains or Checkout Apps
If your store operates on subdomains or uses a third-party checkout app, cross-domain tracking is a must. Without it, user journeys across different domains can be fragmented, leading to inaccurate data. Set up GA4 cross-domain tracking to ensure complete tracking across all touchpoints.
Avoiding these common mistakes ensures your GA4 setup is accurate, efficient, and ready to provide valuable insights. By paying attention to the details, you’ll be able to optimize your store with confidence.
Conclusion
Setting up GA4 correctly is not just about collecting data—it’s about collecting the correct data that drives results. This setup provides a deeper, more accurate understanding of your customers’ behavior, giving you the tools to refine your strategy and boost conversions.
While you can certainly take these steps on your own, working with a trusted partner like ZealousWeb can help you take full advantage of data analytics services. By leveraging their expertise, you can ensure that GA4 is set up correctly and optimized for your unique business needs, saving you time and getting you the insights you need faster. Ready to take your data to the next level? Reach out today and start making smarter, data-driven decisions.
FAQs
What Is the Benefit of Setting Up GA4 for My E-commerce Store?
GA4 provides event-based tracking that offers deeper insights into customer behavior. You can track product views, cart additions, and purchases to optimize marketing, improve conversions, and make data-driven decisions.
How Does ZealousWeb Ensure My GA4 Setup Is Tailored to My Business Needs?
We customize GA4 tracking to your store’s unique sales funnel, capturing key events like add_to_cart and purchase. Every meaningful action is tracked accurately, giving you actionable insights that drive growth.
What If I’m Still Using Universal Analytics—Do I Need to Transition to GA4?
Yes. Universal Analytics is being phased out. GA4 offers advanced tracking and predictive insights. ZealousWeb can set up GA4 alongside UA to ensure a smooth transition without losing historical data.
Can ZealousWeb integrate GA4 with other tools like Google Ads or BigQuery?
Can ZealousWeb Integrate GA4 With Other Tools Like Google Ads or BigQuery?
How Do I Know If My GA4 Setup Is Working Correctly?
We test setups using tools like Google Tag Assistant and real-time reports to verify all GA4 tags and events fire correctly. Our team ensures your tracking is accurate, reliable, and fully functional.
Do I Need to Use Google Tag Manager (GTM) for GA4?
GTM isn’t mandatory but simplifies setup by managing all tags in one place. ZealousWeb often recommends GTM for more flexible and efficient tracking, especially for events and conversions, based on your business needs.
What if I Use Multiple Subdomains or a Third-Party Checkout App—How Can I Track This With GA4?
ZealousWeb sets up cross-domain tracking to follow customers seamlessly across subdomains or third-party checkout apps. This ensures GA4 captures the complete customer journey accurately, giving you reliable data for decision-making.
How Can ZealousWeb Help Me Leverage GA4’s Advanced Features for Better Insights?
We customize GA4 with advanced features like custom dimensions, enhanced eCommerce tracking, and event tracking specific to your store. Our team helps interpret this data to optimize conversions, improve marketing strategies, and uncover actionable insights.


